
05 November 2009
Learn how to apply this abstract photo effect with Photoshop CS3. Your photos will have a high impact look and stronger focus.
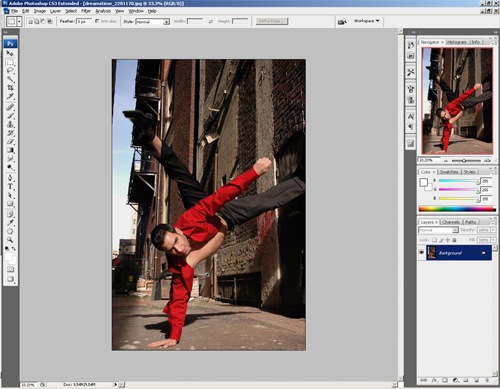
Preview of Final Results

High Clarity Photoshop Tutorial
Step 1
Open an image into Photoshop. This effect works best for portraits rather than landscapes.
Step 2
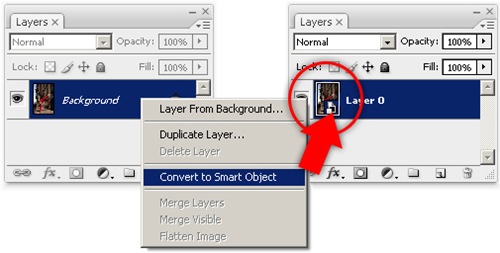
First, to practice non-destructive editing, we'll convert the layer to a Smart Object. Doing this will allow us to use Smart Filters that let you change the filter settings at any time.
Step 3
Choose image > Adjustments > Shadows/Highlights. Adjust the Shadows slider to about 50% so that the shadows are more visible.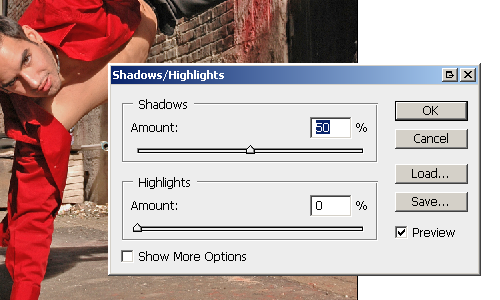
Step 4
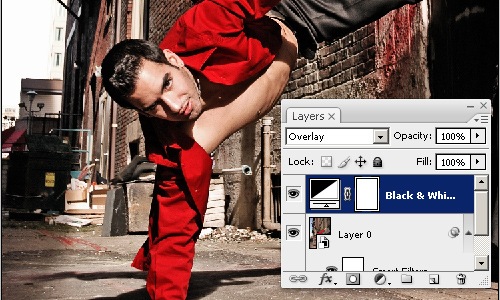
Now we are going to add a harsh lighting photo effect. In the Layers palette, click on the ![]() button then choose Black & White.
button then choose Black & White.
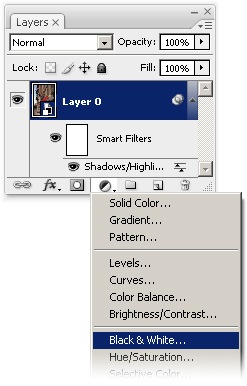
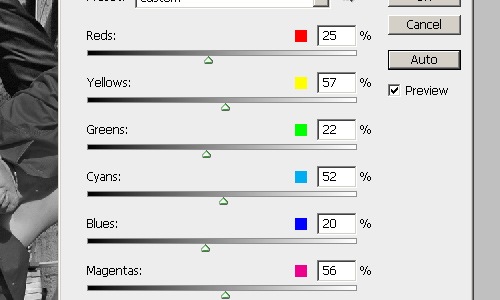
In the Black & White settings, click on Auto then click OK.
Step 5
Change the blending mode of the Black & White adjustment layer to Overlay. You should now get a high-contrast photo effect.
Step 6
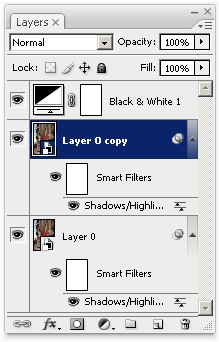
Duplicate Layer 0. To do this, select Layer 0 then press Ctrl+J or choose Layer > Duplicate Layer.
Step 7
Select the new layer (Layer 0 copy) then choose Filter > Sharpen > Smart Sharpen. With the Smart Sharpen tool, we'll increase the local contrast to make the edges look very sharp. Set the Amount to 100% then adjust the Radius setting until you start to see very slight halos around the edges. Read our Local Contrast Photoshop tutorial for more information about this technique.

This is what the image looks like after increasing the local contrast with the Smart Sharpen tool.

Step 8
Add a blank layer mask to the current layer. To do this, choose Layer > Layer Mask > Hide All.
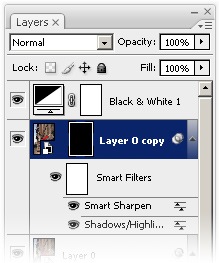
First, press D to reset the foreground and background colors to black and white. Then, select the ![]() tool and paint in the layer mask over the subject. This can be a person, foreground object, or anything that you want to apply the Smart Sharpen filter effect to. If you want to erase any areas, use the
tool and paint in the layer mask over the subject. This can be a person, foreground object, or anything that you want to apply the Smart Sharpen filter effect to. If you want to erase any areas, use the ![]() tool. Try to be precise with the painting because any inaccuracies will be visible later when we reuse the layer mask for another adjustment layer.
tool. Try to be precise with the painting because any inaccuracies will be visible later when we reuse the layer mask for another adjustment layer.
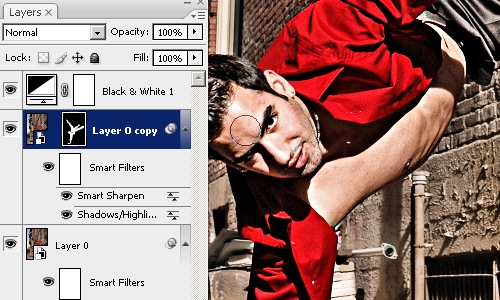
Step 10
Hold the Ctrl key and click on the layer mask thumbnail in the Layers palette. This should create a selection based on the layer mask.

With the selection activated, click on the ![]() button and choose Brightness/Contrast. This will create a new Brightness/Contrast adjustment layer and apply the selection to the layer mask.
button and choose Brightness/Contrast. This will create a new Brightness/Contrast adjustment layer and apply the selection to the layer mask.
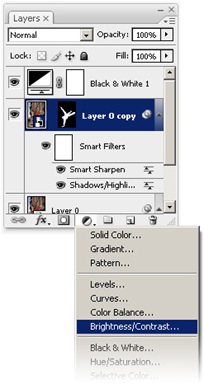
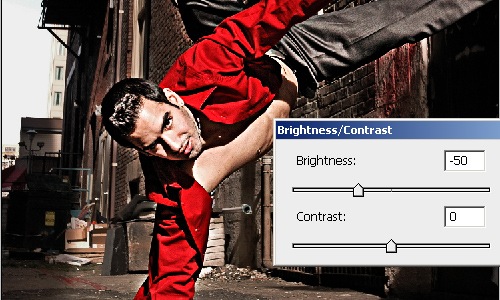
Step 11
In the Brightness/Contrast settings, set the Brightness to -50 then click OK.
Final Results
Here's the final results of this photo effect. If you didn't do a good job painting the layer mask earlier, you can use the ![]() or
or ![]() tools to refine the layer mask.
tools to refine the layer mask.

Before and after:

100% crop:
Mempercepat Akses Internet Indosat IM2, Speedy, Telkomsel Flash Dengan SLIPSTREAM
0 komentar By M 1 CAnda bisa mempercepat akses internet Indosat IM2, Speedy, Flash dengan menggunakan SLipStream
Download SlipStream
Anda cukup menggunakan account trial onspeed yang sudah mati
Tidak perlu merubah server, port, dan lain-lain.
Cukup memasukkan username dan pasword
Cara kerja SlipStream ini sama dengan Onspeed/Nitro ( compressed image dan text )
Seting proxy pada browser anda :
Firefox :
menu tools - option - tab advanced - network - setting - manual proxy - http proxy : 127.0.0.1 - port : 5400
Opera :
menu tools - preferences - tab advanced - network - proxy server - http : 127.0.0.1 - port : 5400
Port tidak harus 5400, yang penting antara port di SlipStream dan browser sama.
Pada kolom “remote server hostname”, diganti server hostname
accel-ss1.dialupturbo.com menjadi: fastweb.slipstreamdata.com supaya tidak error begitu software ini terkoneksi ke internet.
Ini username sama password untuk account di slipstream, silakan anda menggunakan :
Username: trsCYqH5ZL
Password: 94423949
Sumber : situsinformasiinternet.blogspot.com
Getting indexed by Google is not an easy job, it will take week even a month to get your blog indexed by Google. But there is easy way to make your blog indexed by Google. With this tricks, your blog will be indexed in 48 hour.
Sign Up Google Webmaster
Sign up for Google webmaster. This method requires you to have Google account. After you have Google account, sign up at www.google.com/webmaster/Tool and add your blog. Your blog needs to be verified first to insure you are the right owner of your blog by uploading Google verify file to your blog. If you want your blog indexed faster, you need to build sitemap of your blog. The easy way to build sitemap by using plugin, you can download the plugin here. Once your sitemap ready, tell Google your sitemap URL and let Google do the rest.
Sign Up Google Analytic
Using Google Analytics to speed your blog gets indexed. Go to www.google.com/analytics/ and sign up for an account, then add your blog. You need to add few codes on your blog template to identify that you are the right owner. If your blog data not yet saved on Google datacenter, Google bot will immediately crawl your blog for indexing.
Link to Other Indexed Website
Another way to get indexed fast by Google is by getting backlink from establish website or blog. To get link from other website for free, you can put comment on other blog with your link on it or sign up to big forum and make a post with your link as signature or fill guest book on other website with you link as signature. When Google bot crawl their site and find your link on it, Google bot will immediately craw your blog and your blog will indexed fast.
Using Yahoo to Get Indexed
These methods are the fastest way to get your blog indexed by Google. The trick is very simple, you need to have my yahoo account and add your blog RSS URL in my yahoo. After you add your RSS URL, use www.pingomatic.com to ping several time Yahoo with your blog URL. Within 24-48 hours your blog will be indexed by Google.
Other Tips To get indexed by google
Submit to Digg.com
If you submit your site to digg.com and write a nice article about it then this should get your new website indexed on google within 24 Hours off making the thread
Place Link In Signature
If you place your Link to your site in your signature on DigitalPoint Forums or any other popular forum then your site also should be indexed within 24 Hours off doing this.
Submit Your URL
Submitting your url to google will help your site getting indexed within 24 hours by notifiying google your site is ready to be crawled by there bots. use the URL [Only Registered users can see links . Click Here To Register...]
Leave comments on similar Blogs
Post a few comments on other blogs related to yours to get a few links and also this might gain you a bit of extra traffic.
Write a Few Articles
I allways write 2-3 Unique articles of about 500-1000 words before I start a new blog so i have some content to put on the site before I have started.
These methods are all really easy to do and should get your site indexed within 24 hours remember there is no gaurentee!